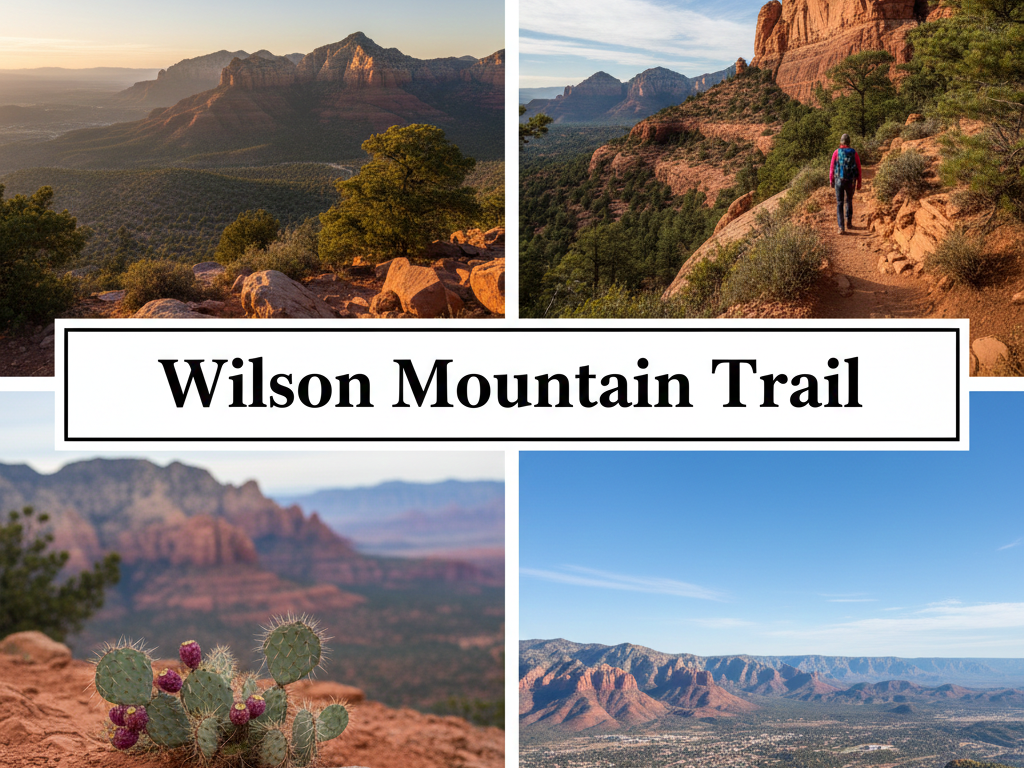
Sedona is famous for its vibrant vortexes, accessible loop trails, and stunning canyon drives. But if you want to experience the absolute best panoramic views in the entire region, you have to get above the iconic red rocks. The Wilson Mountain Trail in Sedona offers exactly that opportunity.
I clearly remember standing at the base of the canyon during my very first visit to the area. I craned my neck to look at the towering summit, intimidated by its sheer size, and wondered if the brutal climb was truly worth the effort. Now that I have finally conquered it, I can confidently tell you it is one of the most rewarding and transformational adventures in Arizona.
While many visitors understandably stick to the lower loops, those who choose to hike Wilson Mountain discover a challenging and deeply personal journey. My legs were definitely burning by the end of the day, but the sweeping, uninterrupted views from the top made me forget all about the physical toll. If you are ready to elevate your Arizona adventure and escape the crowds, here is my complete, step-by-step guide to this incredible trail.
Wilson Mountain Trail Overview and Vital Statistics
Before you lace up your boots and hit the dirt, it is incredibly important to know what you are getting into. This is not a casual afternoon stroll to snap a few photos. It is a true backcountry hike that demands preparation.
- Distance: Approximately 7.1 miles out and back. It becomes closer to 8.5 miles if you thoroughly explore both viewpoints at the summit, as I highly recommend you do.
- Elevation Gain: Over 2,800 feet. You are climbing a literal mountain.
- Difficulty: Strenuous. The elevation gain is relentless.
- Trailhead Location: Midgley Bridge Parking Area.
- Pass Required: Yes. You need a daily Red Rock Pass or an annual America the Beautiful Pass displayed in your vehicle.
Getting to the Trailhead and Parking
Your journey begins at the Midgley Bridge parking lot. It is located conveniently just off State Route 89A, a few miles north of uptown Sedona. Because this specific lot serves multiple trails and a very popular creek swimming hole, parking fills up incredibly fast.
I learned this the hard way on my first attempt when I arrived at 9:00 AM and found cars circling like hawks. I highly recommend arriving before 6:30 AM if you want to secure a spot without a massive headache. The early wake-up call is entirely worth it. Once you park and display your pass, look for the well-marked wooden trailhead sign near the bridge structure.
The Ascent Part One: The Sun-Drenched Red Rocks
The moment I stepped onto the trail, the climbing began. There is no gentle warm-up on this hike. The first section of the hike takes you up a series of sun-exposed switchbacks carved directly into the red dirt. As you navigate the rocky, uneven path, you are surrounded by classic high desert vegetation like prickly pear cactus, sharp agave plants, and fragrant juniper bushes.
I made a conscious effort to take my time on this section and look back frequently over my shoulder. With every hundred feet of elevation you gain, the views of Oak Creek Canyon and the surrounding crimson cliffs become more and more spectacular. The morning light hitting the canyon walls is a photographer’s dream.
The First Bench: A Well-Deserved Rest
After about a mile and a half of relentless, sweaty uphill hiking, the trail finally levels out. You will reach a relatively flat plateau known as the First Bench. I dropped my heavy pack here, drank a massive amount of water, and admired the sweeping vistas of Sedona stretching out far below me.
This is the perfect spot for a mid-hike snack. You will likely see other hikers resting here, debating whether to continue. Let me assure you, you absolutely must keep going. The best is yet to come.
The Ascent Part Two: The Shaded Forest
After a brief rest at the First Bench, the trail shifts gears completely. This was my favorite surprise of the entire hike. I dove into a shaded ravine where the environment changed dramatically. The red dirt gave way to rich, dark soil. The scrubby desert bushes were instantly replaced by towering ponderosa pines and shady oak trees.
This forested section provided a beautiful and much-needed cooling contrast to the exposed lower trail. The scent of pine needles in the air made it feel like I had magically teleported from the desert to the Pacific Northwest. However, the climb is certainly not over. You will face another grueling set of steep, rocky switchbacks to reach the upper plateau of Wilson Mountain. I took these steps slowly and carefully, as the loose rocks can be quite slippery underfoot.
The Summit Plateau and the Two Overlooks
Once I finally crested the rim and stepped onto the summit plateau, the trail leveled out beautifully. The top of Wilson Mountain is vast, flat, and covered in an old volcanic landscape. From here, the trail splits into two distinct directions. I strongly encourage you to visit both.
The Sedona Overlook I headed south first, walking roughly half a mile through the flat grassy area to the Sedona overlook. This is the classic, postcard-perfect view. I stood thousands of feet above the city, looking down at famous rock formations like Coffee Pot Rock, Capitol Butte, and the winding ribbon of highway 89A. You can even see the town of Jerome twinkling in the far distance. The sheer scale of the landscape from this vantage point is mesmerizing. It genuinely felt like I was standing on top of the entire world.
The Sterling Canyon Overlook After taking far too many photos and eating my lunch on a flat boulder, I headed north from the trail junction toward the Sterling Canyon overlook. This side offers a completely different, much wilder perspective. You look deep into the rugged wilderness of the Secret Mountain Wilderness area. I sat on a rock outcropping here in complete silence, enjoying the serene and untouched majesty of the canyon. There are no roads or buildings visible from this side, just pure, endless nature.
The Descent: Protecting Your Knees
What goes up must come down. The hike down Wilson Mountain is arguably harder on your body than the hike up. The constant downward pressure on your knees and the loose, rolling rocks require intense focus. I slipped a few times on the sandy scree. Take your time, use trekking poles if you have them, and do not rush the descent just because you are tired.
My Essential Packing List for Hiking Wilson Mountain
To ensure your trek is safe and enjoyable, keep these crucial tips in mind based on my own grueling but wonderful experience.
- Start Extremely Early: I cannot stress this enough. Beating the crowds is great, but beating the Arizona heat is a matter of life and safety. The lower half of the mountain has zero shade and acts like a solar oven by midday.
- Pack Abundant Water and Electrolytes: I carried 4 liters of water and drank every single drop. The steep elevation gain will make you sweat far more than you anticipate. Bring salty snacks to replenish your energy.
- Wear Proper Footwear: The terrain is incredibly rocky, sharp, and uneven. I wore my sturdiest hiking boots with excellent ankle support, and I was very grateful for them. Leave the running shoes at home.
- Bring Layers: Even if it is scorching hot down in town, the summit of Wilson Mountain is often windy and significantly cooler due to the high elevation. I was glad I packed a light windbreaker to wear while resting at the top.
Tackling the Wilson Mountain Trail in Sedona is a proud accomplishment for any outdoor enthusiast. Your legs will definitely ache by the time you finally return to your car, but the memories of standing high above the magnificent red rocks will stay with you forever. I know they have forever changed the way I look at this beautiful desert landscape.


Leave a Reply